


Pen tablets
Sketch, draw and edit images with a responsive pad, a precise pen and see your creations appear on screen.


안녕하세요, 와콤 가족 여러분! 여러분은 아마도 2점 투시에 대해 이미 들어보셨겠죠? 오늘은 2점 투시도와 그것을 그리는 방법에 대해 이야기해보도록 하겠습니다.
이 그림에서, 우리는 정육면체를 볼 수 있습니다. 보시는 바대로, 우리는 이를 위에서 오른쪽으로 보고 있습니다. 일반적으로 보이지 않게 숨겨진 모서리도 2점 투시에 대한 완전한 이해를 위해 여기에 표시하겠습니다.
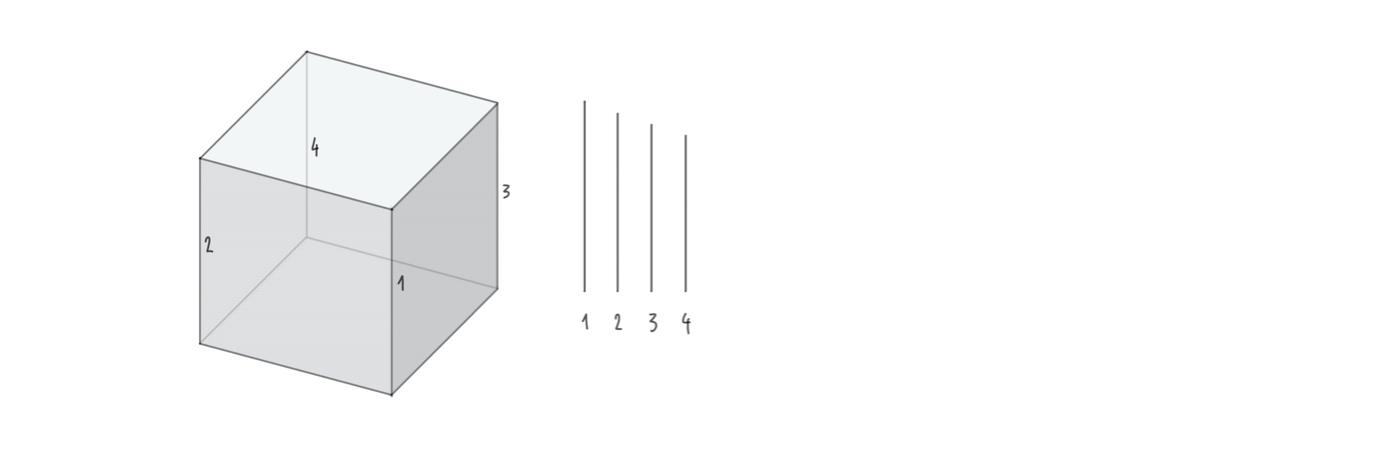
정육면체의 모든 모서리의 길이가 같다는 것은 상식입니다. 하지만, 물체들은 눈에서 멀어질수록 광학적으로 작아집니다. 그 말은, 우리가 2점 투시 소묘에서 수직 모서리의 길이를 각각 다르게 그려야 한다는 것입니다. 우리의 시야에서 가장 멀리 있는 가장자리가 가장 짧아야 합니다.
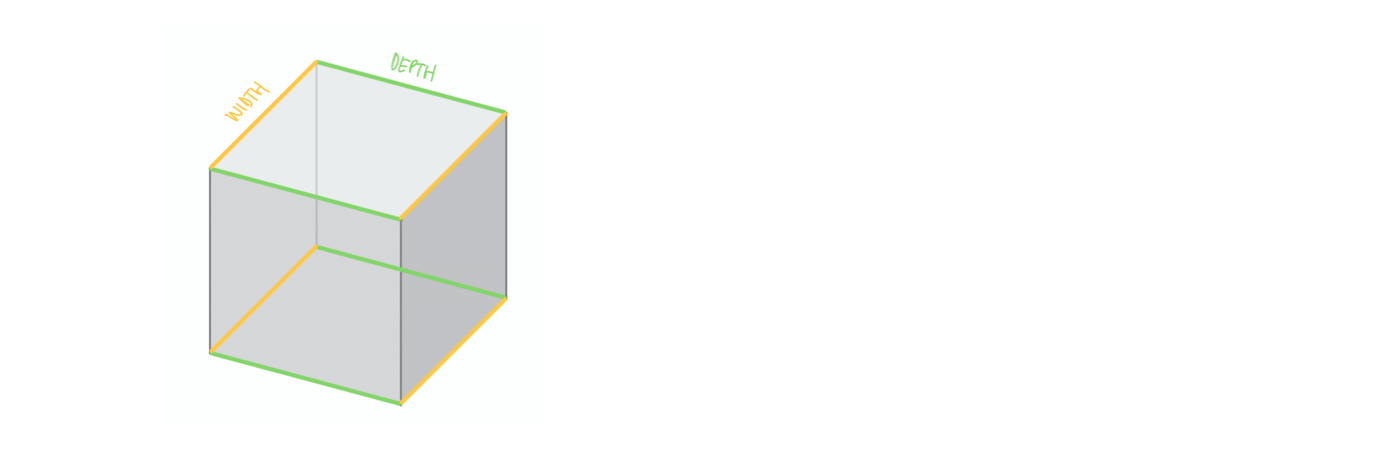
여기 있는 정육면체에서 각각의 노란색과 초록색 모서리들 - 깊이와 너비는 평행합니다. 확신이 가지 않으십니까? 그렇다면, 직접 정사각형으로 확인해 보십시오. 녹색 선 사이의 거리가 왼쪽으로 갈수록 더 커지고, 노란색 선 사이의 거리가 오른쪽으로 갈수록 더 커지는 것처럼 보입니다. 이것은 단지 2점 투시에 내재된 착시 현상일 뿐입니다. 우리의 눈은 멀리 있는 물체가 작아지는 것에 익숙해져 있습니다. 그것이 우리의 그림이 변하는 이유입니다.
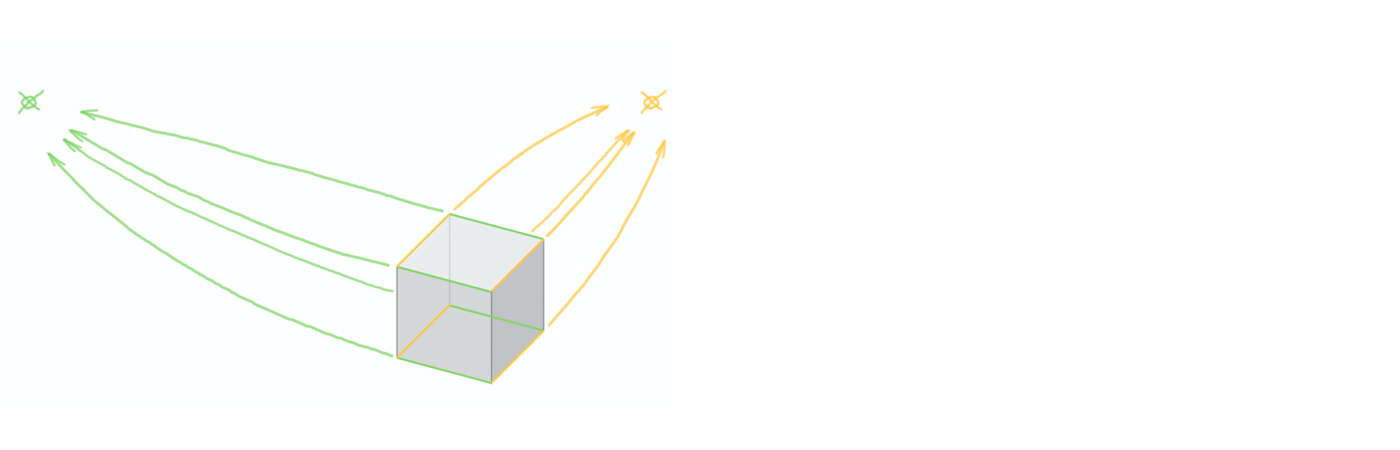
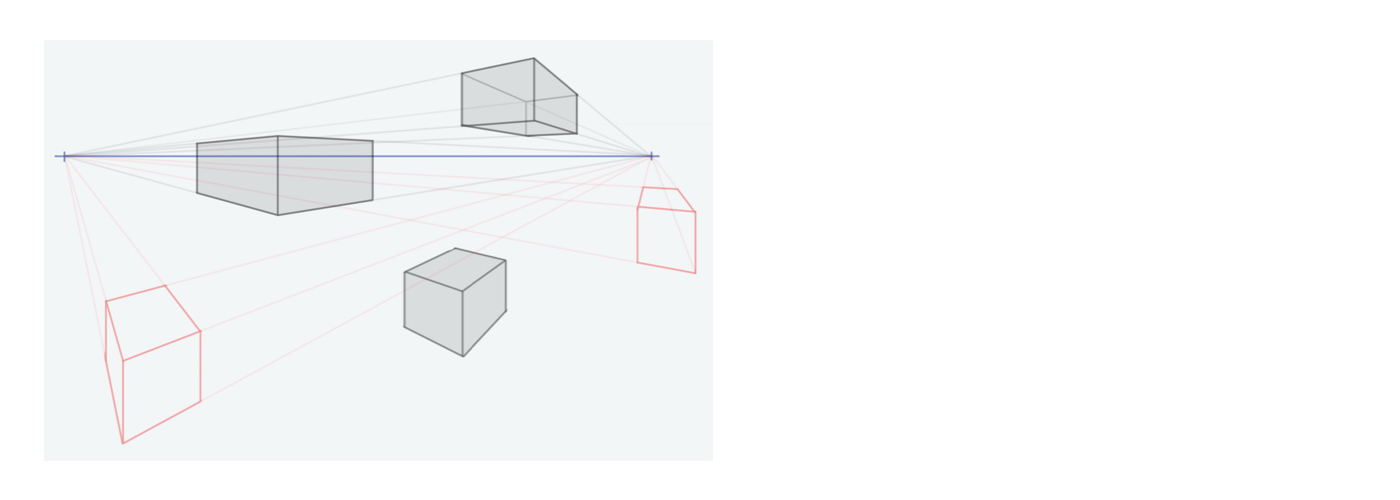
우리의 눈이 원근법으로 인식하는 방식으로 정육면체를 표현하기 위한 몇 가지 방법이 존재합니다. 그중의 하나가 2점 투시입니다. 방법은 물체의 폭과 깊이가 각각 한 점으로 수렴되도록 그리는 것입니다. 우리는 이 점을 "소실점"이라 부릅니다. 모든 녹색 모서리(너비)는 왼쪽 소실점에 연결되고 노란색 모서리(깊이)는 오른쪽 소실점에 연결됩니다. 이것이 어떻게 활용되는지 설명하도록 하겠습니다.
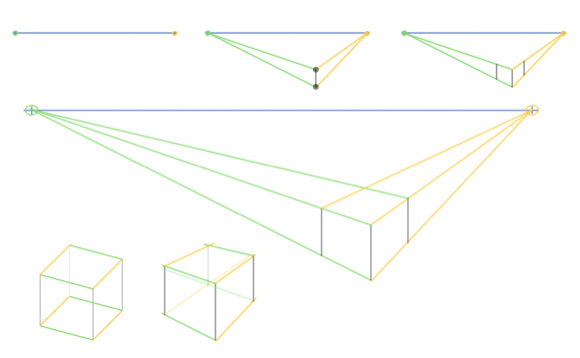
First we’ll need a horizontal line straight across the whole picture: the horizon (here it is in blue). Everything that appears above the horizon is viewed from below, and everything below the line we look at from above. On the horizon we mark our two vanishing points to the far right and left of the image.
Our cube should be placed below the horizon and a slightly right of center of the image. First of all, let’s draw the front vertical edge of the cube (the surface facing us). This will define the object’s position and height. The beginning and end points of the edge are therefore the two corners of the cube facing us. These corners we connect to the vanishing points.
We are now ready to draw the two outer vertical edges. Because their height depends on the two yellow and green lines, you’ll notice these edges are now a little shorter than the first edge. The further back we move the edges, the shorter they become. In other words: what we want in two-point perspective drawing.
The two new edges are parallel to the first edge. In a 2 point perspective drawing, all vertical lines are parallel. In this example, the cube is positioned slightly to the right. This means that the right side of the cube will be a little narrower than the left side. This happens because we are viewing it at a steeper angle. Therefore, we need to move the right edge a touch closer to the first edge.
Last but not least, draw in the back edges of the cube. In order to do this, we connect the two outer top corners of the cube to the opposing vanishing points. The missing back corner of the cube is created at the convergence of these two lines.
And at that, we have drawn a cube in 2-point perspective. Compared to our first cube, this one already looks so much more realistic.
With an eye to constructing more complex objects later on, you should also draw the hidden sides. You merely have to add the missing edges on the reverse side of the cube.
이제 2점 투시 기술을 사용해 더 많은 2점 투시로 그려진 정육면체, 직육면체, 상자를 그려보십시오. 그 결과로 그려진 그림의 각도와 방향은 매우 독특하고 꽤 멋진 미관을 띠게 될 것입니다.
하지만 2점 투시에도 어느 정도 한계가 있습니다. 예를 들어, 물체를 수평선의 오른쪽 끝에 놓거나 소실점 바깥에 놓으면 더 이상 사실적으로 보이지 않게 왜곡되어 보입니다. 마찬가지로 너무 낮거나 너무 높은 위치에 있는 물체에서도 이런 문제가 생깁니다. 따라서, 두 소실점을 처음부터 가능한 한 가장자리에 배치하고, 그림의 크기를 조금 작게 잡으셔야 합니다.
물론, 2점 투시를 사용하여 상자 이상의 다른 모양을 그릴 수 있습니다. 여러분이 조금 익숙해졌다면, 다른 모양을 그려보십시오.
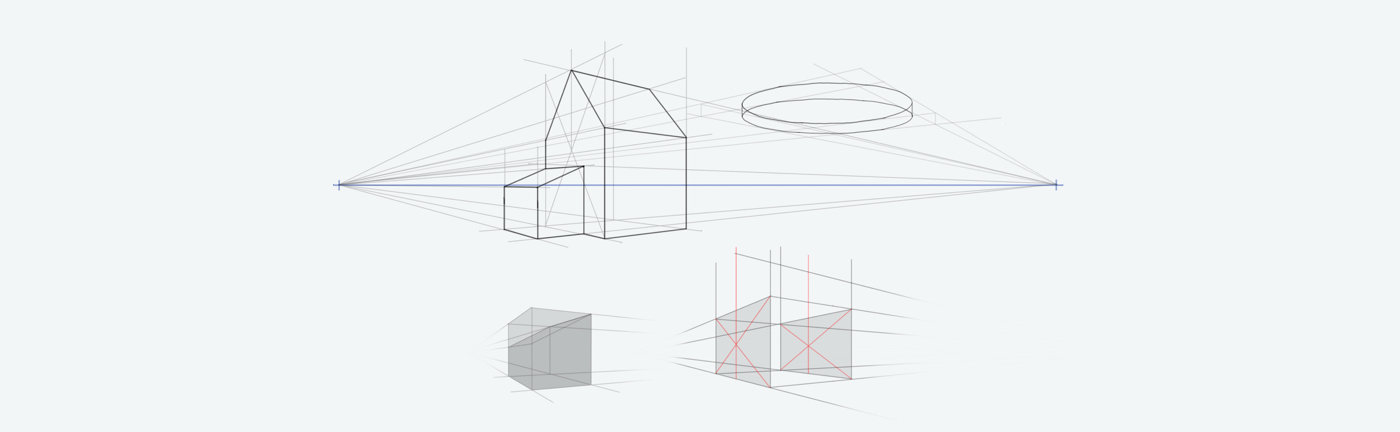
Most shapes can in many ways be composed or arranged into boxes. These boxes can then be used in two-point perspective drawing. It is important to draw in the hidden edges as well.
Start off with a box and cut off an angled edge to draw a slanted roof like in the picture. You’ll again need to connect the newly created corners with their corresponding vanishing points.
In order to create a house roof like in the picture, you need to identify the centers of the house’s sides first. Be careful: because everything is foreshortened towards the vanishing point, the center axis also shifts backwards. You can either determine the center by feel, or if you want to be absolutely sure, draw the diagonals on the front and back of the house. That way you can be sure that you have found the center.
Round objects are always a bit trickier. But here too it helps to first draw a corresponding box that you can fit the round object into. The curves are now going to be much easier to draw in.
When drawing digitally, always make sure that you draw your construction lines on a separate layer. That way, you’ll be able to remove them more easily later on and won’t have to erase around the objects.
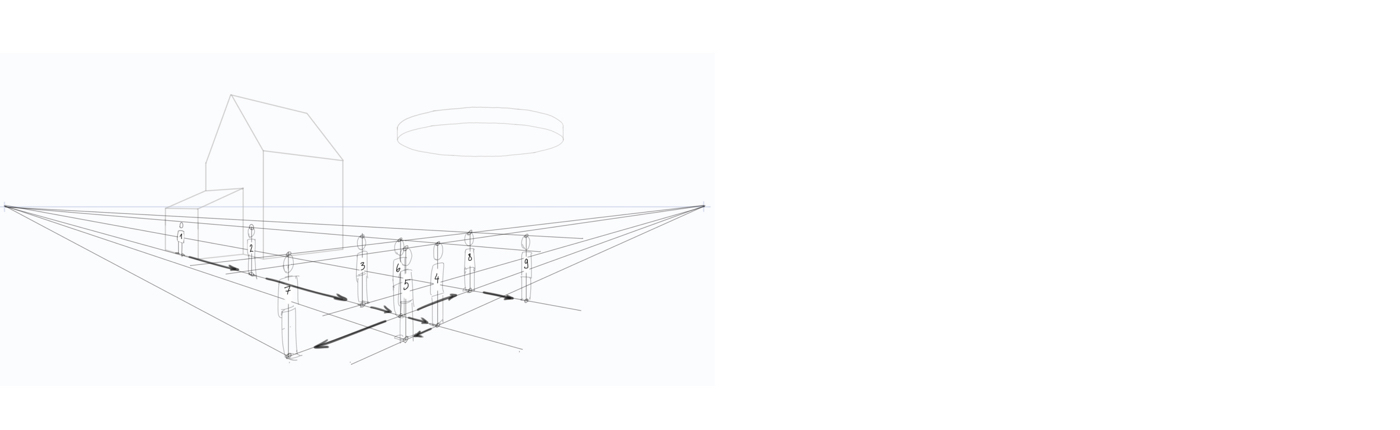
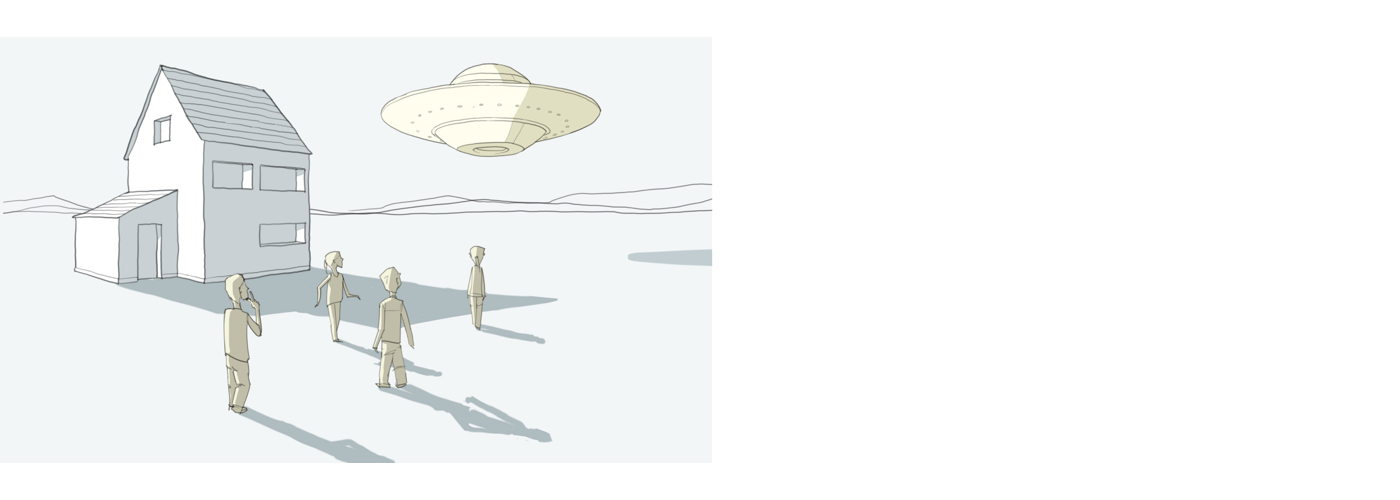
2점 투시는 크기 비율을 결정하는 데도 도움이 될 수 있습니다. 현재 우리가 그림에 배치하고 있는 형태는 어느 정도 동일한 크기여야 합니다 : 크기도 집과의 비율과 일치해야 하므로 어느 한 사람이 끝에서 집보다 2배 이상 커져서는 안됩니다.
사진에서 볼 수 있듯이, 저는 먼저 집 오른쪽에 작은 "참조인"을 그렸습니다. 그를 참고인으로 삼아 그의 머리 높이를 하나씩 다른 사람에게 적용시켜줍니다. 많은 선과 사람을 그리다 보면, 어느새 처음 비율을 잊어버릴 수 있습니다. 불필요한 혼란을 피하는 가장 좋은 방법은 그림처럼 논리적인 순서로 진행하는 것입니다. 또한, 밑그림선을 너무 두껍지 않게 필요한 선만 그려주세요.
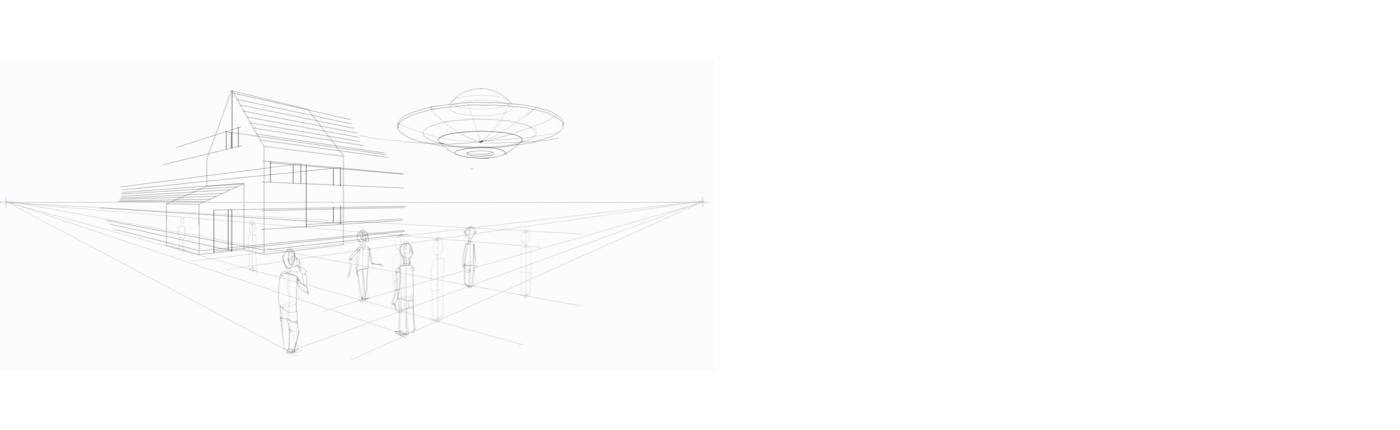
모든 물체를 그렸으면 이제 2점 투시도의 세부사항을 그릴 차례입니다. 하지만 그전에, 더 이상 필요하지 않은 밑그림을 모두 제거해 공간을 확보해야 합니다.
이제 창문, 기와, 문 등 원하는 모든 세부 사항을 추가할 수 있습니다. 자연스럽게 모든 비수직 선은 해당하는 소실점에 연결됩니다.
2점 투시로 무엇을 할 수 있는지에 대해 좋은 배움과 재미를 얻으셨기를 바랍니다. 2점 투시가 매우 유용하긴 하지만, 원근법을 구성하는 데 항상 최선의 방법은 아닙니다. 이후의 튜토리얼에서 다른 상황에서 사용할 수 있는 몇 가지 추가적인 투시를 다룰 것입니다.
그러나 대부분의 경우에서, 특히 사물을 측면에서 비스듬히 보여줘야 하거나 건축물을 다룰 때, 또는 넓은 영역을 묘사해야 할 때, 2점 투시는 매우 효과적입니다. 그리고 특히 외계인이 올 때 제일 효과적일 것입니다.
재미있게 그리시고 곧 다시 만나도록 합시다!
Wacom One creates a familiar pen-on-paper feeling, thanks to a 13.3” screen with natural surface friction and minimal reflection. The pen feels light and natural in your hand and transforms into a pencil, paintbrush or chalk in your selected software. All you need for drawing 2-point perspective. Creative software comes included, along with the ability to connect to your computer, as well as certain Android devices.

Wacom One 13 pen display
Draw, design and create directly on a high resolution screen with a precise pen.

Sketch, draw and edit images with a responsive pad, a precise pen and see your creations appear on screen.

Draw, design and create directly on a high resolution screen with a precise pen.


Wacom의 비전은 자연스러운 인터페이스 기술을 통해 사람과 기술을 더욱 가깝게 만드는 것입니다. 이를 통해 Wacom은 펜 타블렛과 액정 타블렛 뿐만 아니라 전자 펜 스타일러스와 디지털 서명을 저장 및 처리하는 디지털 서명 솔루션 분야에서 세계 최고의 제조업체로 성장했습니다. Wacom의 직관적인 입력 장치의 첨단 기술은 전 세계에서 가장 흥미로운 디지털 아트, 영화, 특수 효과, 패션 및 디자인을 창조하는 데 사용되어 왔으며 비즈니스 및 개인 사용자에게 그들의 개성을 표현할 수 있는 선도적인 인터페이스 기술을 제공합니다. 1983년에 설립된 Wacom은 일본(도쿄 증권거래소 6727)에 본사를 둔 글로벌 기업으로 전 세계에 자회사 및 계열사를 두고 150개국 이상에서 마케팅 및 유통을 지원합니다.