


Pen tablets
Sketch, draw and edit images with a responsive pad, a precise pen and see your creations appear on screen.


Wacom 大家庭,大家好!或许你之前就听说过两点透视?2 点透视图以及怎么创作,正是我们今天要分享的内容。
在这张图中,你会看到一个立方体。如图所示,我们是从上方而且向右观看它。这里还显示出通常隐藏在视图外的边,以便我们完全理解 2 点透视。

大家都知道,立方体所有边的长度都相同。但是,物体离眼睛愈远,看起来就愈小。2 点透视图代表我们在绘制垂直边的时候,必须画出不同长度。较远的边必须更短。

在这张图的立方体中,黄色与绿色边,也就是深度和宽度,彼此是平行的。不信?如果你不确定的话,可以用一个固定正方形来检查。实际上看起来有点像绿线的距离向左变大,黄线则是向右变大。但这只是两点透视与生俱来的视错觉而已。我们的眼睛已经习惯比较远的东西会比较小这件事。光是这一点就够我们绘图时做些改变了。

想要我们眼睛从透视观点来感知立方体,有几种不同的表现方式。其中之一便是两点透视。秘诀是让物体的宽度与深度分别收敛到一个点。我们把这些点称作“消失点”。我们把所有绿色的边(宽度)连到左边消失点,然后把所有黄色边(深度)都连到右边消失点。我现在就来解释这一切是怎么进行的。
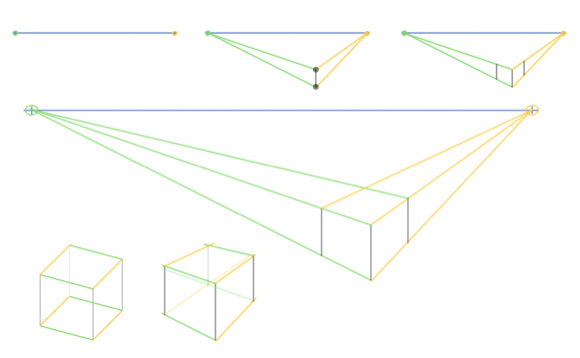
First we’ll need a horizontal line straight across the whole picture: the horizon (here it is in blue). Everything that appears above the horizon is viewed from below, and everything below the line we look at from above. On the horizon we mark our two vanishing points to the far right and left of the image.
Our cube should be placed below the horizon and a slightly right of center of the image. First of all, let’s draw the front vertical edge of the cube (the surface facing us). This will define the object’s position and height. The beginning and end points of the edge are therefore the two corners of the cube facing us. These corners we connect to the vanishing points.
We are now ready to draw the two outer vertical edges. Because their height depends on the two yellow and green lines, you’ll notice these edges are now a little shorter than the first edge. The further back we move the edges, the shorter they become. In other words: what we want in two-point perspective drawing.
The two new edges are parallel to the first edge. In a 2 point perspective drawing, all vertical lines are parallel. In this example, the cube is positioned slightly to the right. This means that the right side of the cube will be a little narrower than the left side. This happens because we are viewing it at a steeper angle. Therefore, we need to move the right edge a touch closer to the first edge.
Last but not least, draw in the back edges of the cube. In order to do this, we connect the two outer top corners of the cube to the opposing vanishing points. The missing back corner of the cube is created at the convergence of these two lines.
And at that, we have drawn a cube in 2-point perspective. Compared to our first cube, this one already looks so much more realistic.
With an eye to constructing more complex objects later on, you should also draw the hidden sides. You merely have to add the missing edges on the reverse side of the cube.

现在画笔交给你,想办法用 2 点透视画出更多个立方体、长方体与盒子。这样画下来,产生的角度与方向非常不同,给人非常酷的美感。
不过,2 点透视也有一定的局限。例如,如果你把一个物体放在图像的靠右侧,或甚至放在消失点之外,这个物体就会扭曲到看起来不再真实的地步。同样的道理,位置放得太低或太高的物体也会出现问题。所以,请确保一开始就把两个消失点放在尽量远的边缘,至于图像则规划得小一点。
当然,2 点透视不只可以用来画盒子。只要你稍微练习一下,就可以试试其他形状。

Most shapes can in many ways be composed or arranged into boxes. These boxes can then be used in two-point perspective drawing. It is important to draw in the hidden edges as well.
Start off with a box and cut off an angled edge to draw a slanted roof like in the picture. You’ll again need to connect the newly created corners with their corresponding vanishing points.
In order to create a house roof like in the picture, you need to identify the centers of the house’s sides first. Be careful: because everything is foreshortened towards the vanishing point, the center axis also shifts backwards. You can either determine the center by feel, or if you want to be absolutely sure, draw the diagonals on the front and back of the house. That way you can be sure that you have found the center.
Round objects are always a bit trickier. But here too it helps to first draw a corresponding box that you can fit the round object into. The curves are now going to be much easier to draw in.
When drawing digitally, always make sure that you draw your construction lines on a separate layer. That way, you’ll be able to remove them more easily later on and won’t have to erase around the objects.

两点透视还可以帮助我们确定比例。我们现在放在景观上的人物大小应该大致相同,但尺寸也应该要与房屋相当才对,这样一个人才不会看起来是房屋的两倍大。
正如各位可以在图中看到的,我先在房子右边画了一个小的“参考人”。以他作为参照,我将他的头部高度一一转化至给其他人。你可能会不知不觉在众多线条与人物之间丧失对画面的概观。如果要避免任何不必要的混淆,建议根据图片按逻辑依次进行。另外,也要确保你的构造线不会太粗,而且只画必要的线条。

所有物体建构完毕之后,就该进入两点透视的细节了。但在开始之前,你得去掉所有已经不需要的引导线来腾出空间。
现在我们可以添加细节,像是窗户、屋瓦、门还有任何你想加的东西。当然,每条非垂直线都会连到相应的消失点。

我希望各位能从中获得一些乐趣,同时也对两点透视有哪些用途的梗概有了不错的认识。虽说两点透视很有用,但这种画法并不总是构建透视的理想方式。在接下来的教学中,我们会再介绍一些可以在其他情况使用的多点透视。
话虽如此,在许多情况,2 点透视的效果还是非常好。尤其从侧面倾斜呈现物体,或是处理建筑、描绘大块面积的时候,都很好用。还有,外星人造访的时候更是特别好用。
祝你享受绘画,下次分享再见!
Wacom One creates a familiar pen-on-paper feeling, thanks to a 13.3” screen with natural surface friction and minimal reflection. The pen feels light and natural in your hand and transforms into a pencil, paintbrush or chalk in your selected software. All you need for drawing 2-point perspective. Creative software comes included, along with the ability to connect to your computer, as well as certain Android devices.

Wacom One 13 pen display
Draw, design and create directly on a high resolution screen with a precise pen.

Sketch, draw and edit images with a responsive pad, a precise pen and see your creations appear on screen.

Draw, design and create directly on a high resolution screen with a precise pen.


Wacom 的愿景是通过自然的界面技术汇聚人与科技。这项愿景让 Wacom 成长为交互式数位板、数位屏及数位触控笔的全球性制造商,以及数字签名保存与处理解决方案提供商。Wacom 直观输入设备所采用的技术已催生出全世界诸多一线数字艺术品、电影、特效、时尚及设计佳作,其界面技术同时为商业和家庭用户提供表达自我个性的利器。创办于 1983 年的 Wacom 公司是一家全球性公司,总部位于日本(东京证券交易所上市编号:6727),分公司及营销与销售代表处遍布世界各地 150 多个国家/地区。